León de papel 3D
El león es un gran carnívoro de la familia de los felinos. Vive en algunas zonas de África y la India, pero hubo un tiempo en que se podía encontrar leones en toda África, Asia y el sur de Europa. Su apariencia y su comportamiento son dignos, forma part de los animales más fuertes del mundo lo que le vale ser conocido como el "rey de las bestias." Los leones suelen viajar en grupos. El grupo suele constar de uno o dos machos, tres hembras y su cría. A pesar de sur presas animales, los leones se alimentan de muchas cosas diferentes, desde los escarabajos y reptiles, a los grandes animales herbívoros.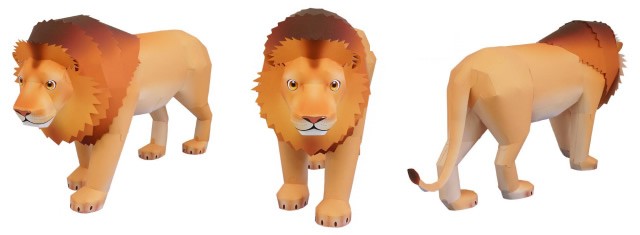 Fabrica un león de papel en 3D gracias a las plantillas de papiroflexia que te proponemos y sigue las etapas de montaje del rey de la selva paso a paso.
Material necesario:
- 1 Tijeras
- 1 regla
- pegamento
- 1 lápiz
- 7 hojas de papel blanco para imprimir tipo cartulina
- impresora Canon a color
Tiempo: entre 3 y 4 horas
Nivel de dificultad: para expertos, a partir de 10 años con ayuda de un adulto
Imprimir las 7 plantillas para recortar que están abajo de la página.
Armar la cabeza del león
- Recortar las partes dedicadas a la cabeza del león (pág. 2 y 3).
- Empezar por doblar y pegar cuidadosamente la parte con los ojos como está indicado en el modelo. Luego, ensamblar con la parte delantera de la melena del león.
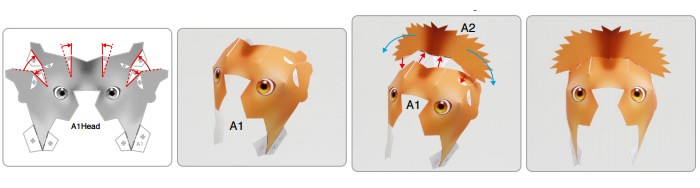
- Ahora hay que doblar el hocico del león y después ensamblarlo con la cabeza. Para el hocico no hay que marcar pliegues netos, utiliza el borde la mesa para crear una curva con el papel. Luego, doblar cuidadosamente las orejas y pegarlas a la cabeza.
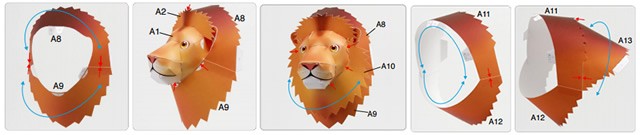
- Ensamblar y pegar las dos partes de melena que faltan. La cabeza del león está terminada. Apartar el conjunto y dejar secar. Mientras, puedes marcar una pausa antes de empezar con el cuerpo.
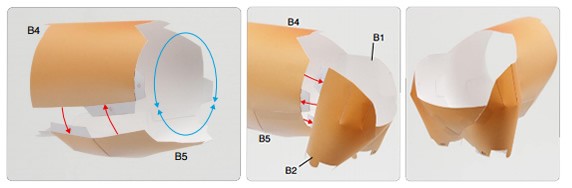
Ensamblar las partes del cuerpo del léon de papel
- Recortar las plantillas que corresponden a las partes del cuerpo (pág. 5 y 6).
- Empezar por la parte delantera del cuerpo del animal. Doblar los hombros (partes altas de las patas delanteras), luego doblar el pecho siempre sin marcar los pliegues netos y pegarlos juntos. Hay que dominar esta técnica de papiroflexia para obtener formas redondas y curvas bonitas.

- Después, formar un cilindro con la parte que corresponde a la espalda y el abdomen, pegarlo y ensamblarlo con la parte delantera del cuerpo.
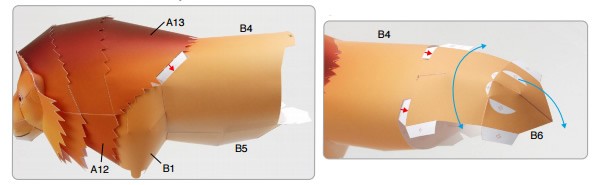
- Pegar el cuerpo con la cabeza, armar los lomos y agregar la parte trasera de la espalda del león.
Acabar con el doblado de las patas y la cola
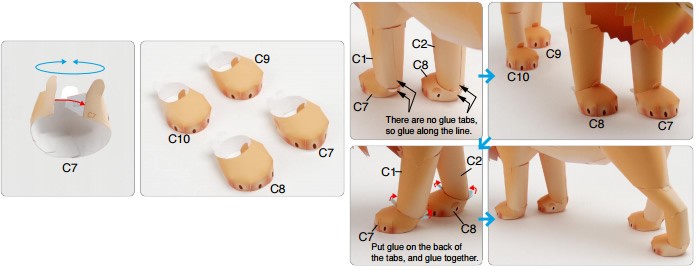
- Recortar la cola del léon y sus patas (pág.7).
- Doblar las 4 patas de papel y pegarlas. Fijar las patas delanteras debajo de la melena.

- A continuación, fijar las patas traseras como está indicado en la guía de montaje.
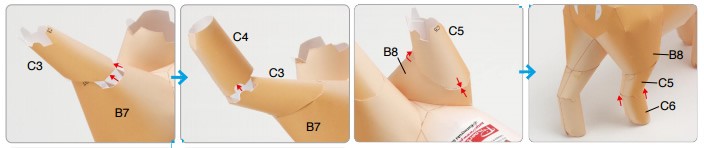
- Armar las extremidades de las 4 patas y ensamblarlas cuidadosamente al león de papel.
- Para acabar, doblar y pegar la cola a la parte trasera. y dejar secar.
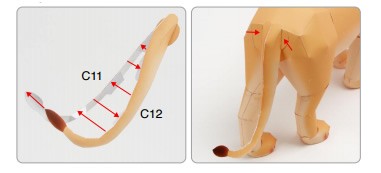
El león 3D de papel está listo.